
by Anthony Bear | Dec 20, 2013 | Setup, Tips and Tricks
Here is a brief tutorial on how to use your new email address on your iPhone.
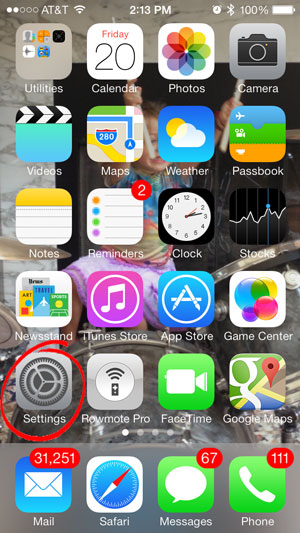 |
Step 1
Find your way to your settings menu.
Hopefully you don't have more than 30,000 unread emails in your inbox already as I do ;-( ... |
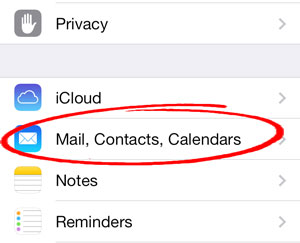 |
Step 2
Look for your Mail settings menu.
So far so good. |
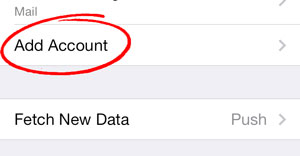 |
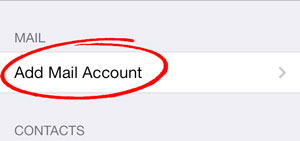
Step 3
Add a New Account.
Easy... Moving on now |
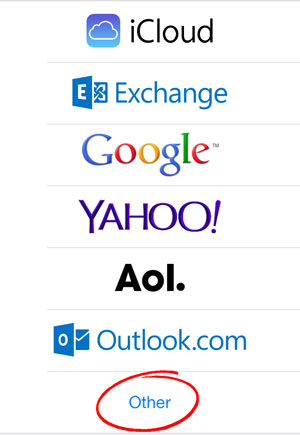 |
Step 4
Select "Other Account".
For iCould, Google, Microsoft exchange, Aol and Outlook emails the setup is way easier and probably does not need a tutorial as you will soon see. |
 |
Step 5
You just want the first option here ... add a mail account. |
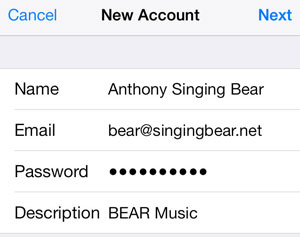 |
Step 6
Ok, now for the juicy stuff. The first field "Name" will be the name that people will see when they receive your email. The "Email" and "Password" are of course self-explanatory. The "Description" will be how the account shows up on your iPhone.
You can change all this later in the settings as well so don't worry if you don't know exactly what you want it to be yet. |
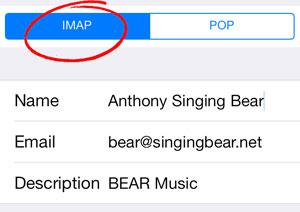 |
Step 7
You really want to select IMAP in this case to make sure that any activity on your phone will also appear on your computer and ipad etc.
The difference between IMAP and POP is essentially that for IMAP you will be moving files around on the server where as for POP you will just be pushing and pulling from the server. To understand this more completely read this link. |
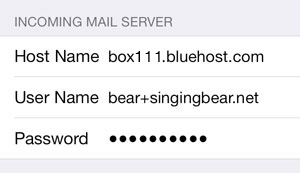 |
Step 8
For hostname if your website is hosted with bluehost, you will find your box number in your bluehost cpanel settings. You can also use your domain as your server (i.e. mail.singingbear.net in this case) but it is best to use the box number to avoid any certificate issues. If you are using a different hosting platform, you can probably use something like mail.YOURDOMAIN.com. Check your host server for details. |
 |
Step 9
After you his enter, it make take several minutes for your account to verify. The reason it takes so long is because the service is looking for the appropriate port for your incoming and outgoing servers. On mac mail and outlook you can define the specific port to speed up this process. Once it has been verified you should see a screen like this. At this point your mail is set up. Follow the next 5 steps to make sure that your phone is synced with your desktop, in other words when you delete a message on your phone you want it to get deleted on your desktop as well. |
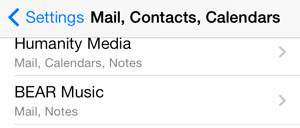 |
Step 10
You have to go back to your mail settings page. You should now see your account on the list. Click on your new account name. In our case it was BEAR Music. |
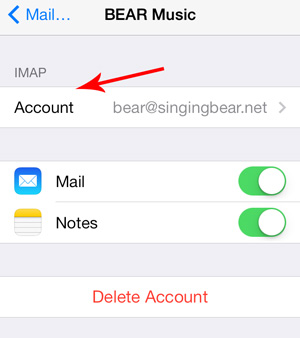 |
Step 11
On this screen you want to click on your account name ... follow the red arrow. |
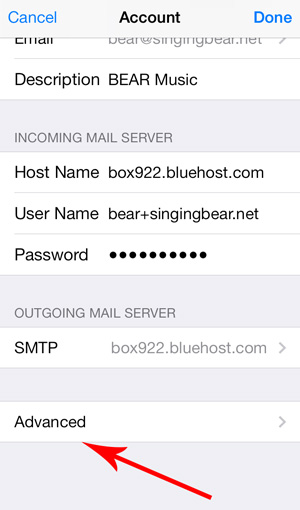 |
Step 12
This screen is a where you are able to change all sorts of settings for your new email on your iPhone. Scroll all the way down this screen to the last option where it says "Advanced" and click there. |
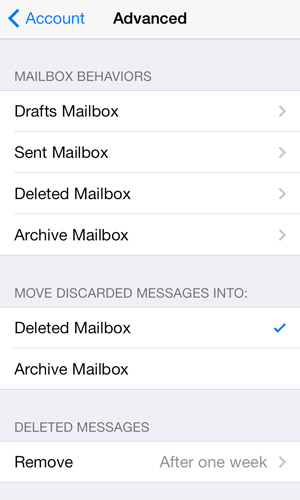 |
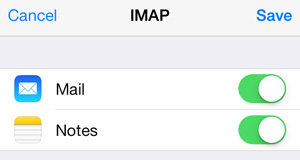
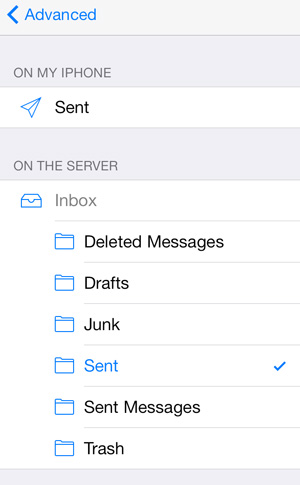
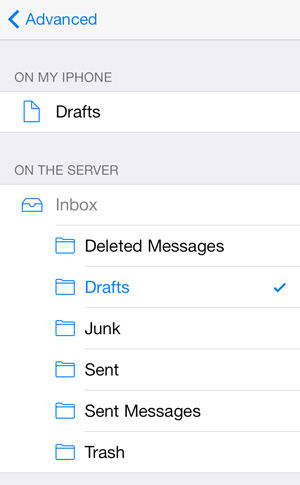
Step 13
Here you simply have to assign your Drafts to go to the drafts folder on your server (in stead of your phone) and the trash to go to the trash folder on your sever, etc. This way, the information will get filed away on your server and therefore all of these changes will be reflected on your desktop as well. I hope this helps you get set up. Leave any comments below if you get stuck and I will try to answer them. Thanks. |
 |
 |

by Anthony Bear | Jul 16, 2013 | Tips and Tricks
Adding a new blog post to your wordpress site is easy for the seasoned blogger and tech savvy professional, but can be a daunting first hurdle for a writer, artist or social media hobbyist looking to expand their reach and content. This article is written for the beginner looking to get to know their wordpress site.
Step 1: Login
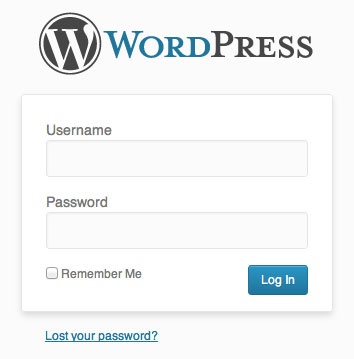
If there is a login link on your homepage or somewhere on your site (often in the footer) click there to login. If not you will need to type the link in your browser. It will be either https://mydomain.com/wp-admin or https://mydomain.com/wp-login.php (replacing "mydomain.com" with your website url). You will probably see a screen like this photo. Type in your username and password. If your username is incorrect with will tell you. If you have lost your password use the reset password link.
You will notice that the login screen is standard for all wordpress sites. If you want to change the design you can use any one of several different plugins. We recommend using Theme My Login or S2Member Plugins.
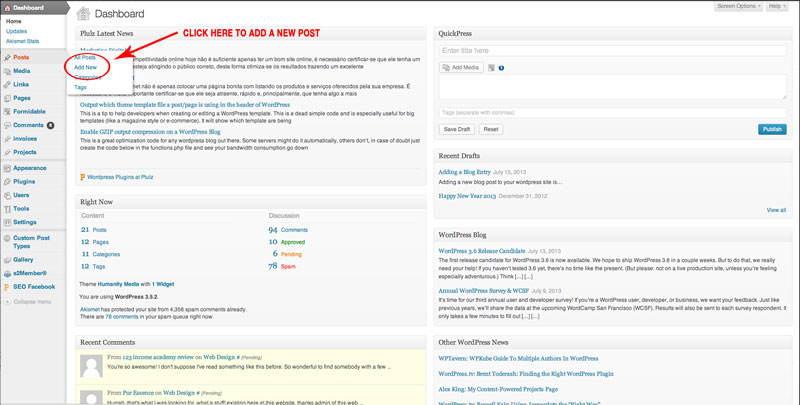
Step 2: Understanding the Dashboard
Once you log in, you will see a dashboard that looks a bit like the image below. On the left side you will see a menu of options including posts, pages, media, appearances, etc. You may also have some others listed depending on which plugins you have installed. In order to begin to create a post click on the add a post button on the left circled in red.
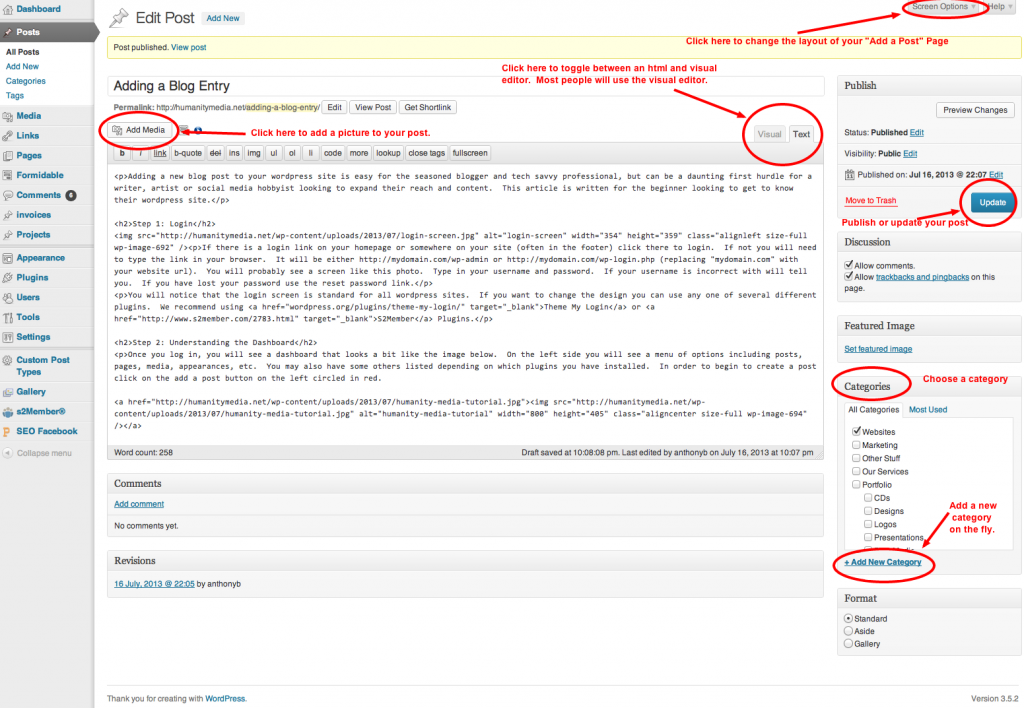
Step 3: Understanding the Add a Post Page
This page you will want to get very familiar with. This is where most of the work is done.
In the main box in the middle is where you will enter your new blog entry. Click on the visual tab to get a sort of visual representation of what the page will look like once it is published.
A few important features to know.
- You can use the Screen Options in the Upper right hand corner to change the layout of the "add a post" page.
- It is important to add tags and categories to each post to increase your search engine compatibility and to clarify the organization of your website.
- Click on the upper left hand corner of an image in the visual editor to edit your image. You can align it left, right or center and change the size of the image as well in the advanced tab.
That is all for the moment. These are literally the very first baby steps towards blogging. Let me know if you have any questions, and happy blogging.
Bear
by Anthony Bear | Jul 25, 2012 | Other Stuff, Tips and Tricks

Formidable Pro is by far our favorite plugin for wordpress for a number of reasons. Not only can this wonderful plugin be used for simple contact pages and feedback forms, it can also be used for elaborate functions like online testing, profile updates, surveys, testimonials, and event creating entirely user based content to your website. We have also successfully used this plugin to create forms for clients to update their websites easily without having to fully navigate the wordpress backend, something that has proven very useful for those who are not very tech savvy.
|

S2Member Pro is an amazing and complex program that is designed for user management. It is especially useful for creating areas of your website that require users to be registered, signed in, and even paying guests. Also this plugin is useful for gathering specific information about your users. It works together very nicely with the rest of the plugins on this page.
|

Simple Facebook Connect is a great way to incorporate Facebook into your wordpress site. You can allow users to login using Facebook. Non-registered users can contribute comments to your site that link back to their profile and feature their picture (see below). As well it provides an easy way to autopost all new content to your associated page on Facebook. Probably the most useful feature of this plugin is that it provides a very easy way to register and login to your site. Gone are the days that users have to have a separate login id and password just for your site. As long as they are logged into Facebook on their browser already, they will be able to register and login using Facebook with just a click of a button. Users can also use their Facebook photos directly in their posts allowing for many more picture options.
|

Sharaholic is perhaps the most artistic looking social network sharing platform for wordpress. With loads of special options, graphics, and detailed menus, it is a relatively easy to customize to your liking. Nowadays, allowing your users the option to share on social networks is a crucial way to get your website, blog, or product out to the world. There are several other plugins out there that provide this service and that work well, we just feel that the simple and sleek deign of this particular plugin actually encourages more shares. Thus plugin in free. Check it out and let us know what you think below.
|

NextGen Gallery is a great way to organize all of your photos into different galleries. There are also several extensions to this plugin which allow you to create very professional displays of your photos on your website, including slideshows, light box displays, thumbnail lists, and include several options for size, captioning, etc. This plugin is also free so it is worth a shot.
|

Simple Twitter Connect was designed by the same folks who brought us the simple Facebook connect plugin. It is a fantastic tool that allows you to stay connected to twitter while you are blogging. You can automatically post to twitter directly from the wordpress dashboard as well as from any post editing page. Also, similar to FBC, one of the best features is allowing users to register and login to the site using their twitter information. Some other amazing functions include the automatic tagging of any twitter tag to the users profile. Example: @humanitymedia.
|

Simple Google Connect is the start of a very great plugin and social network integration. Google plus has just been gathering steam and developing,but it is showing promise and may just overcome Facebook eventually. One of the main reasons for its success is the creation go the hangout and its search engine functionality. Since most people use google to search for content on the web, a google plus post that matches the query can often come up on a search and will include an image of the posts author as well as a link to their profile. Currently, the only real usable aspect of this plugin is to easily login using Google+, but I am sure more is on the way.
|

W3 Total Cache is probably the best cache plugin for wordpress. This plugin will help to speed up your entire site considerably.
|

Reveal Ids is a a very light and very useful plugin for developers. We use this program frequently to help us keep track of all the category, post, and page ids for use in all the above plugins and function codes.
|
by Anthony Bear | Mar 5, 2012 | Tips and Tricks

These days many small business and many of our clients are using Paypal to process all of their online payments. Indeed many of you have even paid for our services here with it. Because of Paypal Related Questions, we are beginning to compile a list of Paypal FAQs. Please feel free to add to the list by leaving a comment below.
- Why Use Paypal?
- What are the downsides to using Paypal?
- How do I create a new user on Paypal?
Why Use Paypal?
- Credit card numbers are never exposed to the seller.
- 100% protection against any unauthorized payments sent from your account.
- Every purchase confirmed with an email receipt.
- Speed through checkout with one account, one password across multiple sites.
- Pay with your credit card, debit card, or bank account. Your choice.
- Accepted on Web sites around the world.
- Easy integration with wordpress based sites with many plugins, api access, and a large development community.
- Create subscriptions and access to exclusive web content fairly easily.
What are the Downsides to using Paypal?
They take too much money. If you are moving more than $1500 a month consistently, it is better to sign up with another service such as Authorize.net or your own bank. Development with these other payment gateways can be a bit more challenging as well so expect significantly more money to your web developers to create an integrated online payment system.
How do I create a new user on Paypal?
- Login to your account.
- Go to Profile --> My Settings
- Go to Manage Users and Click "Get Started"
- Click Add User
- Follow the instructions.
- Make sure to create a password for your new user that no one will ever guess
by Anthony Bear | Jan 9, 2012 | Tips and Tricks
 Favicons are an often overlooked but essential piece in any successful website. They help your viewers to recognize your page amidst the slew of other tabs and pages that they might have open in their browser at any particular moment. The favicons are located in the upper left hand corner of the web browser tab as indicated in the photos.
Favicons are most often the "logo" of the site and in today's fast paced electronic world, the favicons are often identical to the "app" symbol that would be used for the phone app version of the same site. Favicons are essentially .gif files that are either 32 x 32 pixels or 16 x 16 pixels. As such, the chosen image or logo is best if it is scalable and recognizable when it is very small.
The image above are some examples of some of the most well known logos as favicons. Below is an image of where these favicons appear on your browser window.

Making a Favicon is as easy as following the following steps.
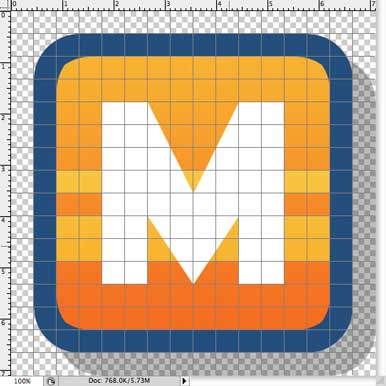
1. First create a perfectly square image that you will use for a Favicon. For this example we will use Photoshop but you can use many different software editing platforms. Note: Photoshop will tell you that you have to purchase or download a separate application plugin but this is not necessary.
2. Once you have the image in photoshop click 'Command+Shift+Option+S' or under File click 'Save for Web'.
3. Make sure the size is 32 x 32 or 16 x 16, the format if GIF and the Transparency is on.

4. Name and save the file as 'favicon.gif'
5. In finder (or windows explorer) navigate to the file. Control-Click (or Right Click) on the file and click 'Rename File'. Rename the file to 'favicon.ico'. It may ask you if you are sure that you want to rename this file. Say yes.
6. Now you simply upload that file into the 'Root folder' of your server. The root folder is usually called public-html or something like that. Once that file is in the root folder, it should come up in the upper left corner when you are loading your page. If you are using wordpress, you must upload the favicon.ico file into the template folder for it to work.
Its as easy as that, I hope this helps you in some way. Please leave comments below.


 Favicons are an often overlooked but essential piece in any successful website. They help your viewers to recognize your page amidst the slew of other tabs and pages that they might have open in their browser at any particular moment. The favicons are located in the upper left hand corner of the web browser tab as indicated in the photos.


