Are You Offering Too Many Choices?

Are You Offering Too Many Choices?

I run into this kind of question every day in my profession. What exactly should I offer my clients or my customers? Although it might seem more intuitive to offer your customers a million options for your products and services, studies actually show that less choices equates to more overall sales. Sheena Iyengar in her TED talk below helps us to see that in a world inundated with hundreds of choices we all must make every day, people are simply less and less likely to take the time wading through options to find their golden ticket.

Sheena Iyengar, professor of business at Columbia, relates a study conducted by her team on the market impact of the overwhelming choice. She actually found that a tasting table of 6 flavors of jam will far outsell a table of 24 flavors. The bottom line is that by diluting your option menu with too much variety of items will only work to make the chooser more confused and less likely to buy. Have you ever been at one of those restaurants with a bible sized menu of unlimited options? It can actually create a wave of stress and anxiety just to seen all those options in one place.

Part of our job in providing specialty services or products is finding and offering only a handful of the best possible options. So, if you are wondering how to apply this to your business, just ask yourself, "What is my absolute best product or service?" In other words, if you were buying from yourself, what would you buy? Often times that is exactly the first and only thing you should offer your customers.

The Age of Responsive Technology

The Age of Responsive Technology

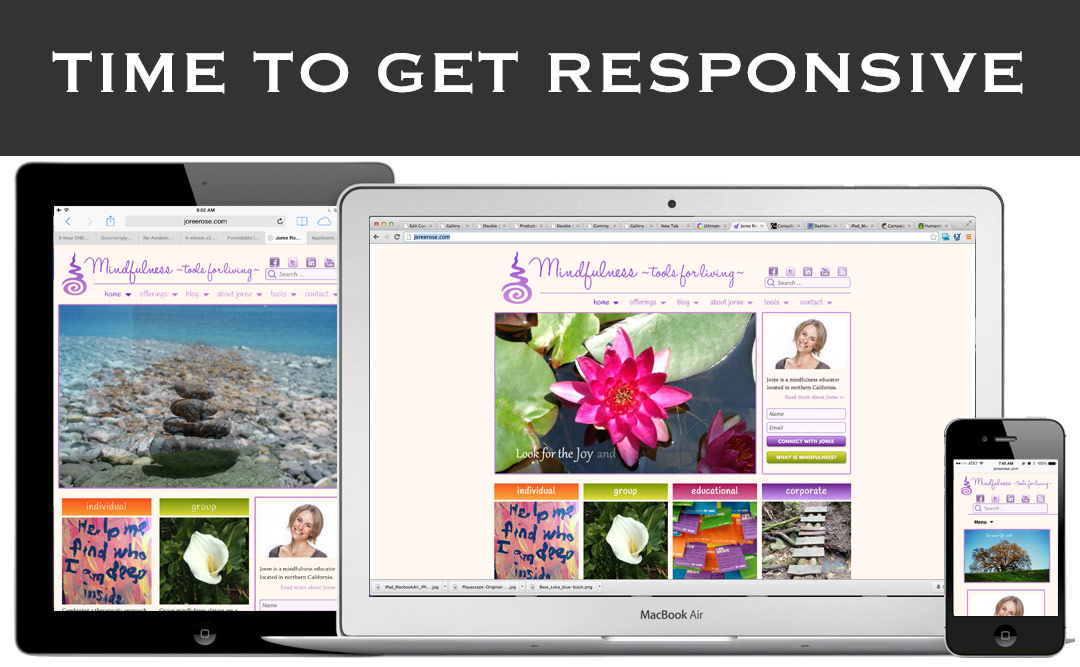
Things are moving way too fast in the technological world. Don't worry, everyone is overwhelmed. Even the biggest tech firms in the world are concerned that they might not be "with the times". What does it mean to be with the times ... to be RESPONSIVE! So, what is RESPONSIVE DESIGN?

We used to just say mobile friendly, and even as little as 5 years ago this seemed like a revolutionary concept. Actually it was in Finland in 1996 that the first ever mobile devices accessed a website and only in 1999 that it became commercially available in Japan. According to a 2013 report from Walker Sands, the percentage of website traffic coming from mobile devices jumped from 17.5% in Q3 2012 to 23.1% in Q4 2012. An early 2010 ITU (International Telecommunication Union) report said that with the current growth rates, web access by people on the go — via laptops and smart mobile devices – is likely to exceed web access from desktop computers within the next five years (Wikipedia).

So what does all this mean for us, the little guys in a big technological world? Its time to GET RESPONSIVE. That means, making your website easily accessible and navigable by any device. There are a number of new themes on WordPress that can help an entrepreneur on a budget accomplish this goal, but everything has is quirks and inconsistencies. Here is an example of a site that we recently developed for Joree Rosenblatt, a fantastic mindfulness education expert and up and coming author.

We developed her site from scratch as a child theme of the WordPress 2013 theme that comes installed with the new versions of WP. If you really dig through the css code of the Twenty-Thirteen Theme, you will see a whole section devoted to different media sizes. The code will look something like this @media (max-width:700px) { css code here }. We base our designs on iPads and iPhones, because that is what we have in the office. For us the media sizes are 768px or less for iPad and 359px or less for iPhone. With some simple tweeks, we were able to get the site to show up differently on all three devices as pictured above.

Another key to responsive design is steering away from Flash. At this point, Flash is rapidly declining and will soon be outdated since it is not available on most devices. Also, as you can see from the animation on Joree Rosenblatt's site, it is not necessary to use flash to arrive at the same results. However, doing something as elaborate as Jim Carrey's website in HTML5 is probably close to impossible (if you haven't checked out Jim Carrey's site before you have to do it but on a Computer Only). However, you can accomplish quite a bit of animation and interactivity with css, html5 and javascript - all legible by devices.

Things are moving fast, and it is very easy to get overwhelmed. The best we can do, sometimes, is respond to the the changes as they arise. If you are a small business owner or a blogger or just an individual on a budget, give us a call and we will make your designs responsive for a fraction of the cost of the other big firms. Call us today.

The Best Time to Send an Email

The Best Time to Send an Email

woman_on_the_phone_looking_at_a_laptop_screen
Even after the development of social media, google ads, affiliate systems and an overwhelming number of other options for marketing your product and service, direct email campaigns are still the best avenue to get the word out. But everyone's question is always, "When is the best time to send my email campaign?"

While there remain many debates on the subject, we found this 2012 study conducted by Experian global information group that gives some insight into this question. And despite all the debates and misconceptions, it turns out that the highest open ratio, click through ratio and transaction ratio across all businesses comes in fact in the evenings and weekends. Maybe that is because everyone tends to send emails during the week and in the morning, as you can see by the volume on the chart.

Check out the results yourself:

dayofweek

According to this chart, a higher ratio of emails are engaged on the weekends than during the week. That might be because of the sheer volume of emails that are sent during the week as opposed to the weekend. Let's face it, we get completely bombarded with emails on Monday morning, so many of them just get swept under the rug. I mean, how many emails can we actually open and read, right? This past Black Friday and Cyber Monday I think I received almost a hundred emails from the collective big-marts like Best Buy, WalMart, Target, Staples etc. (I don't even know how they ever got my email.) So what did I do, "Delete, Delete, Delete, Delete, ..."

But, on the weekends, when I'm sitting there twiddling my thumbs on my iPhone with my daughter at the playground, I occasionally check out those one or two emails that come filtering down the pipeline. Especially if they have a fun twist to them.

Perhaps the same reasoning could be applied to the results from the "Time of Day" study.

timeofday

I attribute these results to one of two possibilities. Either people are opening more emails on the evening and weekends because they are sitting at home playing Candy Crush on their phones at the time and have nothing better to do or more emails simply get opened when fewer are being sent. And although it may depend greatly on the type of business you are conducting, as in entertainment emails get opened more on weekends and business emails are opened more during the week, it doesn't hurt to look a little bit more closely at these results. And maybe, it would be a good idea to give it a shot and see if it works.

READ THE FULL STUDY HERE

CONTACT US TO HELP YOU WITH YOUR EMAIL MARKETING CAMPAIGN

Adding a Blog Entry

Adding a Blog Entry

Adding a new blog post to your wordpress site is easy for the seasoned blogger and tech savvy professional, but can be a daunting first hurdle for a writer, artist or social media hobbyist looking to expand their reach and content. This article is written for the beginner looking to get to know their wordpress site.

Step 1: Login

login-screen

If there is a login link on your homepage or somewhere on your site (often in the footer) click there to login. If not you will need to type the link in your browser. It will be either http://mydomain.com/wp-admin or http://mydomain.com/wp-login.php (replacing "mydomain.com" with your website url). You will probably see a screen like this photo. Type in your username and password. If your username is incorrect with will tell you. If you have lost your password use the reset password link.

You will notice that the login screen is standard for all wordpress sites. If you want to change the design you can use any one of several different plugins. We recommend using Theme My Login or S2Member Plugins.

Step 2: Understanding the Dashboard

Once you log in, you will see a dashboard that looks a bit like the image below. On the left side you will see a menu of options including posts, pages, media, appearances, etc. You may also have some others listed depending on which plugins you have installed. In order to begin to create a post click on the add a post button on the left circled in red.

humanity-media-tutorial

Step 3: Understanding the Add a Post Page

This page you will want to get very familiar with. This is where most of the work is done.

In the main box in the middle is where you will enter your new blog entry. Click on the visual tab to get a sort of visual representation of what the page will look like once it is published.

A few important features to know.

  • You can use the Screen Options in the Upper right hand corner to change the layout of the "add a post" page.
  • It is important to add tags and categories to each post to increase your search engine compatibility and to clarify the organization of your website.
  • Click on the upper left hand corner of an image in the visual editor to edit your image. You can align it left, right or center and change the size of the image as well in the advanced tab.

Edit Post ‹ Humanity Media — WordPress

That is all for the moment. These are literally the very first baby steps towards blogging. Let me know if you have any questions, and happy blogging.

Bear

Our Favorite WordPress Plugins

Our Favorite WordPress Plugins

Formidable Pro is by far our favorite plugin for wordpress for a number of reasons.  Not only can this wonderful plugin be used for simple contact pages and feedback forms, it can also be used for elaborate functions like online testing, profile updates, surveys, testimonials, and event creating entirely user based content to your website.  We have also successfully used this plugin to create forms for clients to update their websites easily without having to fully navigate the wordpress backend, something that has proven very useful for those who are not very tech savvy.

S2Member Pro is an amazing and complex program that is designed for user management. It is especially useful for creating areas of your website that require users to be registered, signed in, and even paying guests. Also this plugin is useful for gathering specific information about your users. It works together very nicely with the rest of the plugins on this page.

Simple Facebook Connect is a great way to incorporate Facebook into your wordpress site. You can allow users to login using Facebook. Non-registered users can contribute comments to your site that link back to their profile and feature their picture (see below). As well it provides an easy way to autopost all new content to your associated page on Facebook. Probably the most useful feature of this plugin is that it provides a very easy way to register and login to your site. Gone are the days that users have to have a separate login id and password just for your site. As long as they are logged into Facebook on their browser already, they will be able to register and login using Facebook with just a click of a button. Users can also use their Facebook photos directly in their posts allowing for many more picture options.

Sharaholic is perhaps the most artistic looking social network sharing platform for wordpress. With loads of special options, graphics, and detailed menus, it is a relatively easy to customize to your liking. Nowadays, allowing your users the option to share on social networks is a crucial way to get your website, blog, or product out to the world. There are several other plugins out there that provide this service and that work well, we just feel that the simple and sleek deign of this particular plugin actually encourages more shares. Thus plugin in free. Check it out and let us know what you think below.

NextGen Gallery is a great way to organize all of your photos into different galleries. There are also several extensions to this plugin which allow you to create very professional displays of your photos on your website, including slideshows, light box displays, thumbnail lists, and include several options for size, captioning, etc. This plugin is also free so it is worth a shot.

Simple Twitter Connect was designed by the same folks who brought us the simple Facebook connect plugin. It is a fantastic tool that allows you to stay connected to twitter while you are blogging. You can automatically post to twitter directly from the wordpress dashboard as well as from any post editing page. Also, similar to FBC, one of the best features is allowing users to register and login to the site using their twitter information. Some other amazing functions include the automatic tagging of any twitter tag to the users profile. Example: @humanitymedia.

Simple Google Connect is the start of a very great plugin and social network integration. Google plus has just been gathering steam and developing,but it is showing promise and may just overcome Facebook eventually. One of the main reasons for its success is the creation go the hangout and its search engine functionality. Since most people use google to search for content on the web, a google plus post that matches the query can often come up on a search and will include an image of the posts author as well as a link to their profile. Currently, the only real usable aspect of this plugin is to easily login using Google+, but I am sure more is on the way.

W3 Total Cache is probably the best cache plugin for wordpress. This plugin will help to speed up your entire site considerably.

Reveal Ids is a a very light and very useful plugin for developers. We use this program frequently to help us keep track of all the category, post, and page ids for use in all the above plugins and function codes.

Paypal FAQs

Paypal FAQs

These days many small business and many of our clients are using Paypal to process all of their online payments. Indeed many of you have even paid for our services here with it. Because of Paypal Related Questions, we are beginning to compile a list of Paypal FAQs. Please feel free to add to the list by leaving a comment below.

  1. Why Use Paypal?
  2. What are the downsides to using Paypal?
  3. How do I create a new user on Paypal?

Why Use Paypal?

  • Credit card numbers are never exposed to the seller.
  • 100% protection against any unauthorized payments sent from your account.
  • Every purchase confirmed with an email receipt.
  • Speed through checkout with one account, one password across multiple sites.
  • Pay with your credit card, debit card, or bank account. Your choice.
  • Accepted on Web sites around the world.
  • Easy integration with wordpress based sites with many plugins, api access, and a large development community.
  • Create subscriptions and access to exclusive web content fairly easily.

What are the Downsides to using Paypal?

They take too much money. If you are moving more than $1500 a month consistently, it is better to sign up with another service such as Authorize.net or your own bank. Development with these other payment gateways can be a bit more challenging as well so expect significantly more money to your web developers to create an integrated online payment system.

How do I create a new user on Paypal?

  1. Login to your account.
  2. Go to Profile --> My Settings
  3. Go to Manage Users and Click "Get Started"
  4. Click Add User
  5. Follow the instructions.
  6. Make sure to create a password for your new user that no one will ever guess
The Importance of a Favicon

The Importance of a Favicon

Favicons are an often overlooked but essential piece in any successful website.  They help your viewers to recognize your page amidst the slew of other tabs and pages that they might have open in their browser at any particular moment.  The favicons are located in the upper left hand corner of the web browser tab as indicated in the photos.

Favicons are most often the "logo" of the site and in today's fast paced electronic world, the favicons are often identical to the "app" symbol that would be used for the phone app version of the same site.  Favicons are essentially .gif files that are either 32 x 32 pixels or 16 x 16 pixels.  As such, the chosen image or logo is best if it is scalable and recognizable when it is very small.

The image above are some examples of some of the most well known logos as favicons.  Below is an image of where these favicons appear on your browser window.

Making a Favicon is as easy as following the following steps.

1. First create a perfectly square image that you will use for a Favicon.  For this example we will use Photoshop but you can use many different software editing platforms.  Note: Photoshop will tell you that you have to purchase or download a separate application plugin but this is not necessary.

2. Once you have the image in photoshop click 'Command+Shift+Option+S' or under File click 'Save for Web'.

3.  Make sure the size is 32 x 32 or 16 x 16, the format if GIF and the Transparency is on.

4. Name and save the file as 'favicon.gif'

5. In finder (or windows explorer) navigate to the file.  Control-Click (or Right Click) on the file and click 'Rename File'.  Rename the file to 'favicon.ico'. It may ask you if you are sure that you want to rename this file.  Say yes.

6. Now you simply upload that file into the 'Root folder' of your server.  The root folder is usually called public-html or something like that.  Once that file is in the root folder, it should come up in the upper left corner when you are loading your page.  If you are using wordpress, you must upload the favicon.ico file into the template folder for it to work.

Its as easy as that, I hope this helps you in some way.   Please leave comments below.